Multiple Linking Styles
You can create page-wide linking styles using the Page Properties button (in your Property Inspector) or under Modify..>Page Properties
Choose the category: Links (CSS), and that will let you create basic text linking styles
More than one style
If you want to create more than one style, then the easy way to do that is a compound based on the div ID.
1. Create a link.
a) Highlight the text or image you want to be a link
b) Put in a hashtag or link to a file in the link box in the Property Inspector
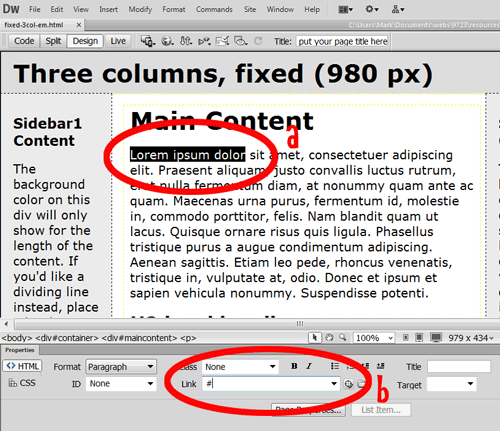
2. Click on the link (don't highlight the whole link, just put your cursor somewhere within it)
3. Click on the the new rule button in the CSS panel [#2 in the first screenshot here].That will bring up a compound that will look like this:
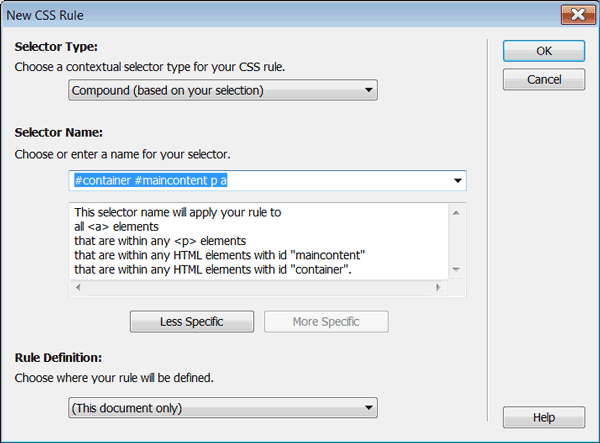
But it doesn't have to be this complex. This is saying that whenever there is a link <a> inside a paragraph <p> in the #maincontent div, in the #container div, to apply the rule.
All it needs to say is #maincontent a (whenever there is a link inside the #maincontent div):

You can just delete the parts of the compound you don't need.
4. Then create the button as you would like it to look. Common categories you'll play with:
- Type (for the font, font size, etc. Note: if you don't want the underline to appear under the link, choose Text Decoration of None.)
- Background (for bg color if a button)
- Block (to center the text)
- Box (to set padding and margin on one side to space the buttons evenly)
- Border (if you want there to be a border)
Do you want a rollover effect?
If so, you'll need to add a second rule that will include the hover.
The easy way to do this is to right click on the CSS style in the styles panel and choose... Duplicate. [screenshot here]
This will bring up the new rule dialog again, and in the compound box you will have to add the ":hover" after the a. EG:
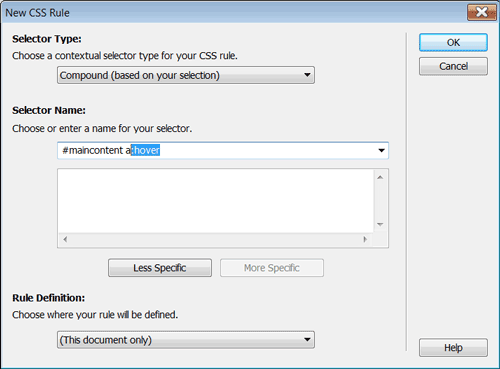
Then in the rule definitions, you'll change whatever the hover effect should look like.
You can create as many linking styles has you have IDs.
It's also possible to do all of this in code as well, and there is the possibilty of doing a "pseudoclass" as well in the code view.
Note: if you don't want your button text to change to the default colour, you'll need to create an a:link and an a:visited style too.
ID-based Linking Styles in Code
You can easily do multiple linking styles, based on your layout. So, say you wanted to have a linking style for you main content, and your sidebar. In your stylesheet, you add another compound ID-tag CSS:
#content a {definitions}
#sidebar1 a {definitions}
If you want to have hover styles, you would also need to add those:
#content a:hover {definitions}
#sidebar1 a:hover {definitions}
Multiple pseudo-classes
You can also do multiple linking styles that act like a class, but only for links.
However, you will need to create these in the actual css code. The easiest way to do this is to create your main linking style using the CSS Panel. I usual create these linking styles for how I want my embedded (text) links to look. (That way you don't have to worry about adding a special style to the links you have in your content.)
Then you need to create new linking styles that essentially combine the a:link style with a custom class (those are the ones that are named with a dot before the name, eg., .newlink).
Simply open up the .css file (or go to the head part of the document if it is embedded), and copy your linking styles.
Paste them underneath your main linking style, and then add the .name to the new set of styles. They'll look something like this:
a {
}
a:link {
}
a:visited { }
a:hover { }
Then add the name for the new linking style:
a.mainnav {
}
a.mainnav:link {
}
a.mainnav:visited {
}
a.mainnav:hover { }
Save the file, and then they will appear in the CSS Panel, and you can then use the edit button to make the link style look the way you want.
To use the new link style, just click on the link you want to change (one click, anywhere in the link), and you will be able to choose that linking style from the style pulldown in the Properties Inspector.