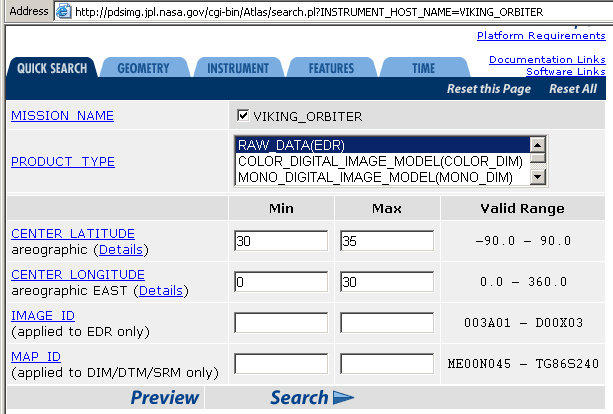
Step 1: finding the image (example is from the Viking data in the Planetary image Atlas): enter search criteria. Fig. 1
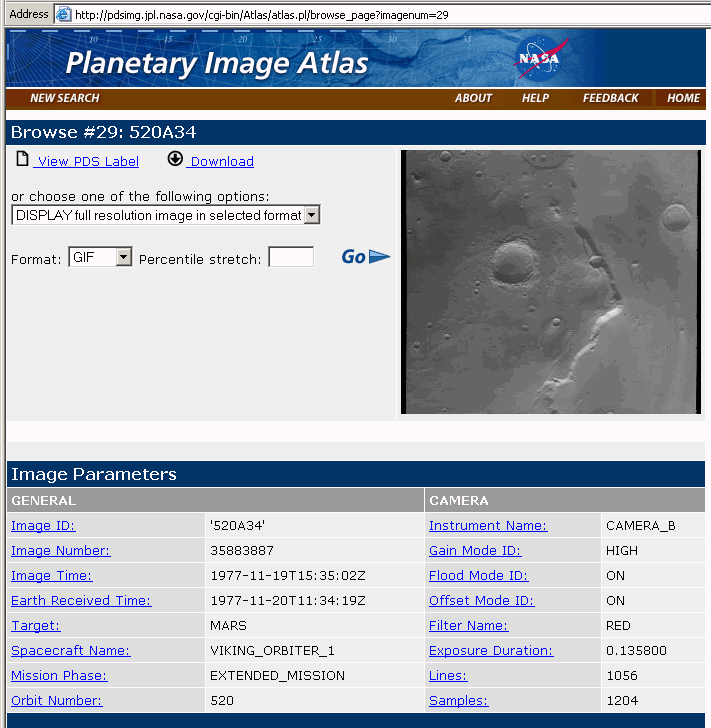
Step 2: selecting a useable image from the set provided. Fig. 2
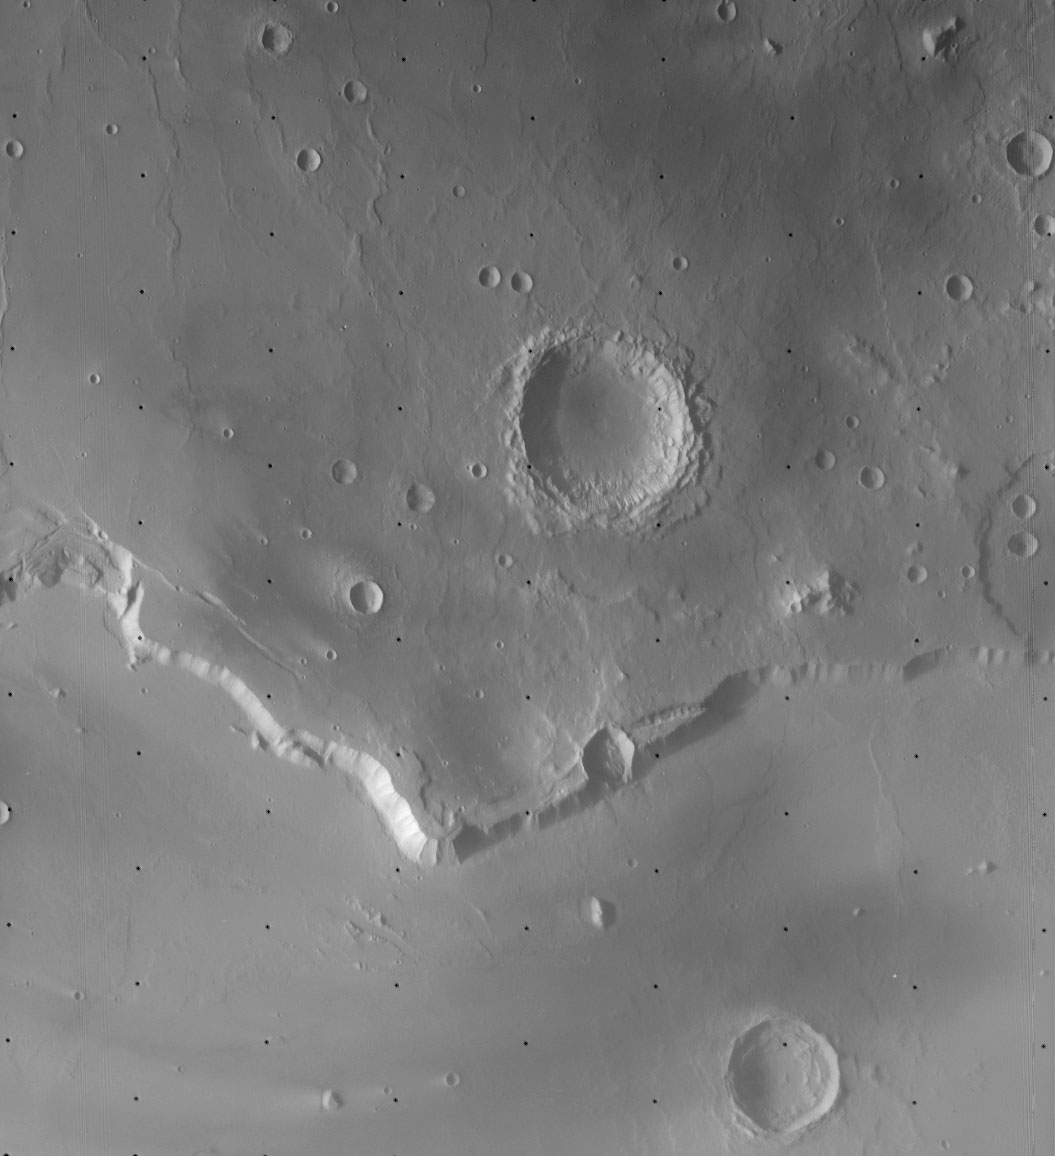
Step 3: downloading the image - check image data below it as well. Fig. 3 , Fig. 4
Step 4: any initial cleanup, processing etc. Fig. 5
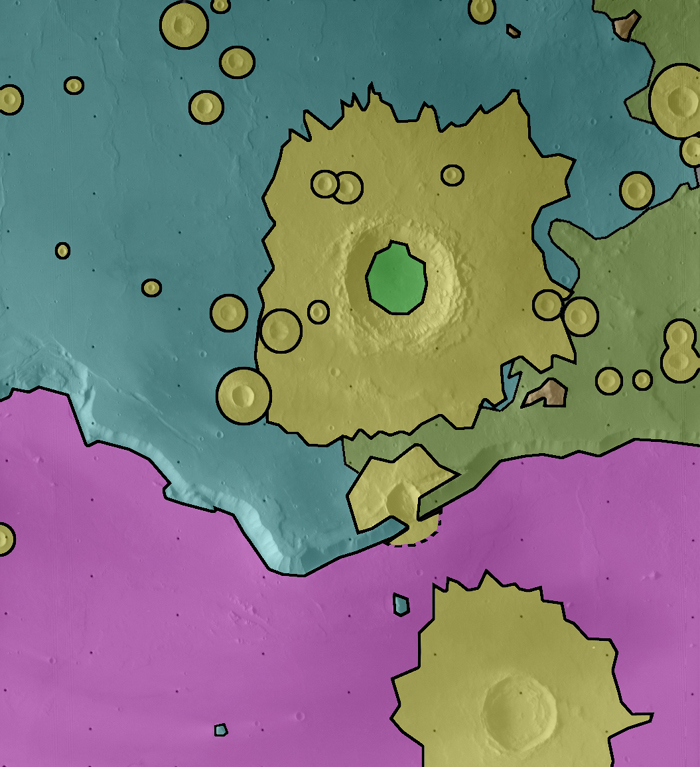
Step 5: check image context (marked on photocopied map, or an image of the surrounding area - this is MOLA topography from the Themis site): Fig. 6
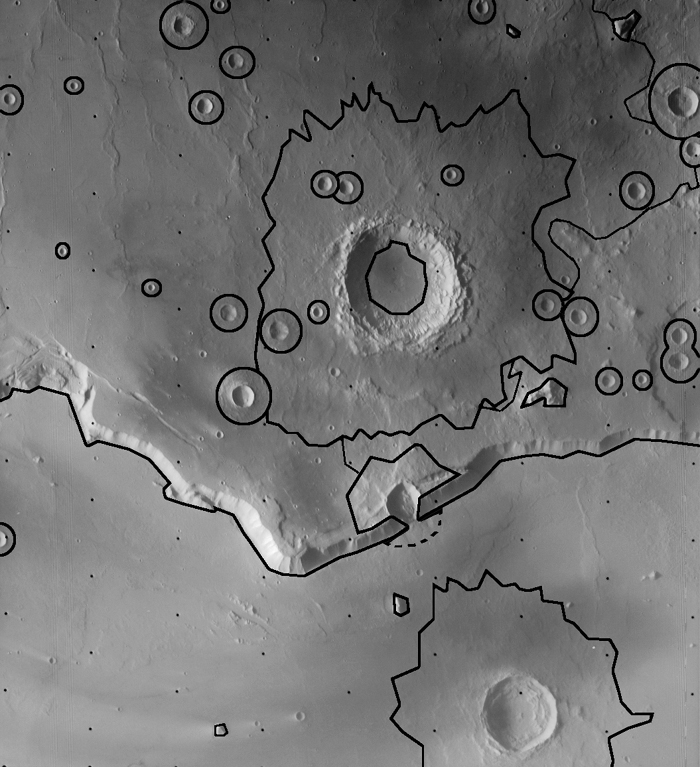
Step 6: outline areas of different appearance - smooth, rough, high, low, distinctive texture etc., including crater deposits (ignore very small craters or other features). Think in terms of material on the surface, not the shape of the feature - so map crater ejecta, not the crater cavity. Do this in any graphics program (Photoshop, CorelDraw, Photopaint etc.) or on paper with pens etc. If on paper, make a bright (overexposed) print or photocopy for mapping, and use the image on the screen or a better print for interpretation. Fig. 7
Step 7: Shade or colour your map if you like - in a graphics program or with highlighter pens or crayons on paper. Fig. 8
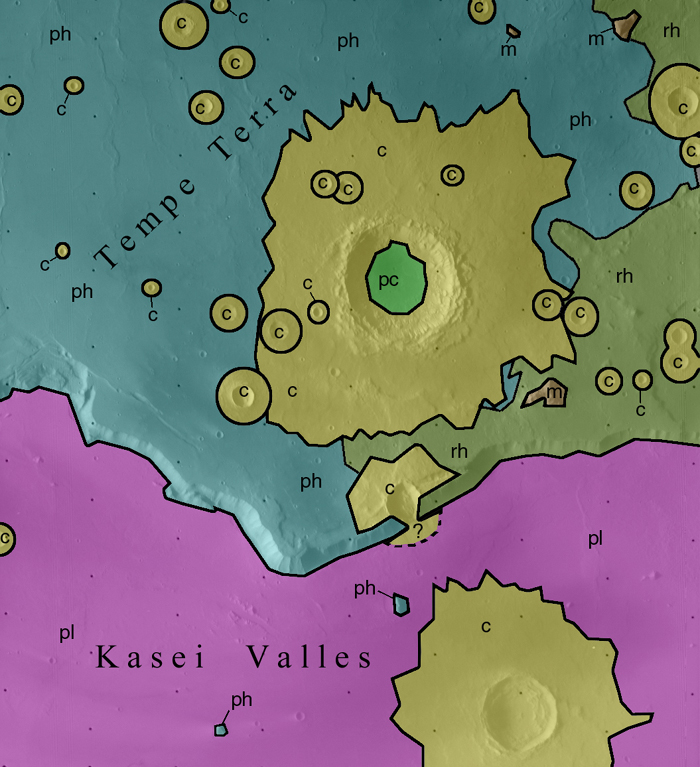
Step 8: Label each mapped "unit". The labels will be abbreviations of unit names, so plan those names now. They should be descriptive of appearance, not any interpreted origin, which may be disproved later. Ideally a map should remain valid as interpretations change. Add any feature names at this stage, (refer to maps). Fig. 9 . My unit names are shown in the table below. This figure includes the cross-section line from the next step.
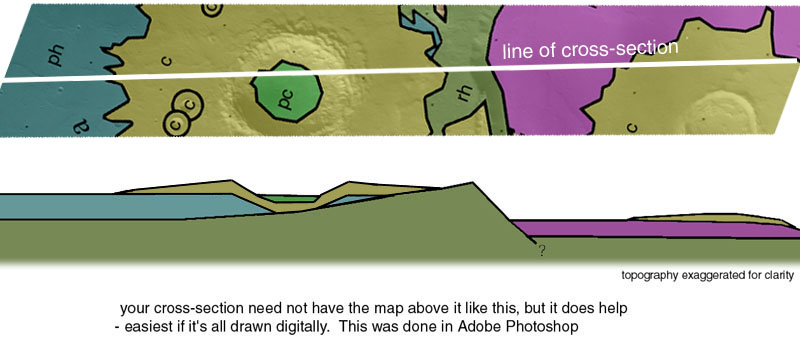
Step 9: Draw a cross-section. This is tricky and needs some thought. Start by choosing an interesting line for the section - make it cross a variety of units. If it's boring you didn't choose correctly. Estimate topography very roughly - a basic horizontal line, but allowed to drop down into craters, rise up over hills, etc. Exaggerate that relief so it is clearly visible. Then think about your units - how do they stack up to create the distribution seen on the map? We will go over this more in class. Fig. 10 - here's my version. Remember to plot the line of section on the map.
Step 10: Provide unit descriptions:
| Map Label | Unit name | Description | Interpretation |
| c | crater material | rough-textured deposits surrounding fresh craters, including flow-like lobes around some larger craters. Often grades into surroundings, so edges are uncertain. Omitted for very small craters, inferred around intermediate sized craters where texture is not visible at image scale. | crater ejecta: debris excavated by impact and deposited around crater. Consists of a mixture of the materials comprising the target, modified in places by mass wasting or later aeolian deposition. |
| pl | plains, low elevation | relatively smooth material of the lowlands beneath a prominent east-west scarp. Includes wrinkle ridges and small valleys. | Wrinkle ridges suggest basalt plains. Valleys are probably related to the Kasei Valles flood south of the mapped area. Plains may be covered in places with a thin layer of sediment from the Kasei Valles flood. |
| ph | plains, high elevation | relatively smooth material of the Tempe Terra highlands above a prominent east-west scarp. Includes wrinkle ridges. | Wrinkle ridges suggest basalt plains. |
| pc | plains, crater floor | smooth material inside a large crater. | accumulation of wind-blown fine grained sediment, or material falling from crater walls. |
| rh | rough highland material | rugged, hilly surface on the Tempe Terra plateau. Contact with unit ph not always obvious, and partly buried by crater materials. Context image suggests this is old heavily cratered terrain. One eroded or partly buried crater rim is partly visible just above the prominent scarp at the east edge of the image. | Old heavily cratered terrain, consisting of multiple laters of crater ejecta. |
| m | mountain material | material of several rugged peaks. | high-standing components of the old cratered terrain, probably including very old crater rim materials equivalent to unit c. |
Step 11: Assess relative ages. Use context image as well. Here are some observations:
Unit rh appears to be heavily cratered terrain in the context image, so it must be the oldest material. More craters for a given area, and they look eroded or partly filled in, not like othe fresh craters nearby. This emphasizes the value of a context image.
Unit m is part of rh.
Unit ph is seen in the context image to have fewer large craters than rh, so is younger. Also at the top of the context image it appears to embay old crater rims.
Unit pl fills the depressions left by break-up and removal of the highlands (rh and ph) - seen best in context image. Therefore it is younger. Not much obvious difference in crater density between pl and ph, so there may not be much time difference, but as the big scarp cuts ph that material must be older than pl. Kasei Valles floods also passed through this low area after the scarp formed - no evidence that water eroded the scarp, it's not a riverbank, but there are small channels here and there in the lowlands within the image.
Unit c, crater materials, includes only relatively young craters, mostly because only young craters are obvious here. Note that the old eroded crater at right centre (edge of image) is not mapped - it's just part of the rh material. But we can see age differences between the crater materials mapped as unit c. Small craters on the large crater ejecta deposit must be younger or the large crater ejecta would blanket them. Some craters are a bit fresher than others in appearance.
Unit pc lies inside a fresh crater and must be younger than the crater.
Step 12: Devise an age sequence for material units and events (stratigraphic column):
youngest: pc and the most recent examples of c.
c (craters).
pl and the (unmapped) Kasei Valles flood.
formation of the big scarp during disruption of the highlands.
ph covering pre-existing surface.
oldest - units rh and m, typical part of the ancient crust of Mars.
Step 13: describe geological history of the area (brief summary):
The earliest events recorded here are multiple impacts early in Martian history, forming units rh amd m. After heavy cratering ended, lavas flooded the region to form unit ph, in places embaying crater rims and mountains in rh. Wrinkle ridges and craters formed in unit ph. Then the erosion which separated the Martian southern highlands from the northern lowlands removed parts of the highlands here, creating large scarps and isolated plateau remnants of the highlands (especially east of the mapped area). The lowlands were flooded by lavas with wrinkle ridges (unit pl). The Kasei Valles flood swept through the lowlands, mostly south of the mapped area, but some water flow outside the main channel may have cut a few small valleys and deposited sediments on parts of unit pl. More recently several impact craters formed in the area. The most recent events are the youngest craters (their ejecta is unit c) and a patch of smooth plains (unit pc), probably wind-deposited sand or dust, in one of the large craters.