Biology 318G
Jan. 2005
Biology of the FUNGI
Laboratory Exercises
General procedure
The general objective of these laboratory exercises is for students to experience the investigative process, to acquire specific skills, and be ready to demonstrate these by presenting their findings to the class. Every student must maintain good records in a permanent lab book (please do not use a ring binder). Marks (10%) will be assigned based on the accuracy, clarity, and originality of presentations as recorded in the lab book. A feature of some labs will be a quiz based on material from previous labs – such quizzes + general participation (attendance) will amount to 10% of the final grade.
Lab. # 1. Introduction to Eukaryotic Microbiology
Lab # 2. Chromistan fungi, Chytrids and Zygomycetes.
Lab # 6. Genetics ( Computer based)
Lab # 7. Nematode destroying Fungi.
Lab. # 1. Introduction to Eukaryotic Microbiology
The study of microorganisms requires the use of certain special techniques aimed at seeing, culturing, enumerating, or sampling microbial species in different environments. The most frequently used techniques vary depending on the type of organisms. In this first exercise, you will acquire expertise in the use of the microscope to see microorganisms. You will learn to use the dilution plate count technique to enumerate yeast, the streak-plate technique for the isolation of yeasts, and the spot inoculation technique to isolate and purify moulds.
A. Microscopy
One of the fundamental skills that you, as a microbiologist, must master is the ability to use a compound microscope with accuracy and ease. You have had some experience using a microscope in Bio 022 / 023, Bio 290a and perhaps other courses. Below follows a quick review of good technique.
1. Properly setting up the microscope
A diagram of the major parts of the microscope will be discussed. The compound microscope has two sets of lenses: the ocular (eyepiece) and the objectives (stage lenses). The oculars are standard at 10X magnification. The objectives are mounted in a revolving nosepiece and consist of 4, 10, 40 and 100 power lenses. The three lower magnification lenses are "dry" lenses, but oil must be used (only) with the 100X objective. Oil is used to increase the numerical aperture of the lens. The numerical aperture describes the light gathering ability of a lens. Lenses with high magnification or power require considerable light and the immersion oil is used to direct the refracted light path into the objective. Most of your microscopes are parfocal, meaning that it is not necessary to make major focusing adjustments when switching from one objective to another.
Adjustment of the light will be important for all lens combinations. In general, use a sufficient light to give the specimen good clear contrast but not enough to be dazzling, causing possible eye strain. Most importantly, learn and practice the use of every appropriate control knob on your microscope. A good microscopist constantly adjusts the fine focus as observations are made.
Handle all microscopes with extreme care! They are delicate optical instruments subject to permanent damage if they are pounded around. Carry your scope with both hands and deposit it gently on the bench. Place the microscope on the edge of the bench so that your can use it comfortably. Our Olympus microscopes have rheostats to control the brightness of the light itself.
General Procedure.
2. Calibration of the microscope
To calibrate the diameter of the field of view for each of the 4 objectives, use the following procedure.
1. Select the 10X objective lens and place on the stage a stage micrometer. The stage micrometer is an etched 1 mm line divided into 100 parts. Each division corresponds to 10 µm. Adjust the slide such that it traverses the broadest part of your view and determine the number of divisions required to cross the field.
2. Repeat this procedure for each objective.
3. Record the size of the field of view for each magnification. This table will be very useful for many exercises during this term.
3. Preparation of a wet mount
EXERCISE 1. Basic microscopy and observation/drawing skills.
Using the fungal material provided, examine under the microscope and draw what you see.
1. Take a clean microscope slide.
2. Place a drop of water, or other liquid such as lactophenol, on a slide and suspend some material likely to contain microorganisms.
3. Hold a coverslip at a 45 degree angle to your slide. Lower the coverslip gently onto the drop. This reduces the capture of air bubbles.
4. Transfer the slide to the microscope stage and observe under low power to scan the preparation. You may find that organisms of interest are too small and further magnification is needed, in which case you should increase the magnification. At each step try to estimate the size of some cells.
5. Watch for special features within the cells.
Notes on biological illustration
Some important principles apply to scientific drawing of biological material. You must endeavour to report observations accurately. This requires not so much artistic talent as care and attention to detail.
1. Use a sharp pencil (HB has optimal hardness).
2. Find a representative specimen and examine it dynamically - scan it in depth using the fine focus.
3. Make your drawing relatively large so as to allow for detail. Avoid drawing replicate examples of the same type of organism. One drawing of good quality is more informative than several mediocre ones.
4. Label each drawing with the name of the organism, the features being observed, and the magnification (ocular x objective). When appropriate, include a size reference bar based on your field calibration.
5. Label features with the organism, with lines pointing at each specific feature. Use correct grammar in the labels - if a line points at one thing, use singular, if the line points at two or more things, use plural.
B. Microbiological culture techniques
Because of the small size of microorganisms, much microbiological work starts with preparing cultures, so that a significant amount of material is available for subsequent manipulations. Before you proceed, you must first get acquainted with some fundamentals on the aseptic handling of microorganisms.
Notes on aseptic technique
Sometimes referred to inappropriately as "sterile technique", aseptic technique is a series of precautions used to prevent contamination when performing microbiological manipulations. Aseptic work entails a frame of mind more than anything else. One assumes, rightly or not, that tools, the air, and surfaces surrounding us are teaming with living cells (germs) that have the potential to contaminate cultures. Aseptic technique is also the basis for laboratory safety in microbiology. Many microorganisms have the potential to be hazardous, and should be treated accordingly.
Pipets
1. Sterilized tools such as pipets are wrapped in airtight containers which must be opened carefully, at the end opposite from the "business" part of the tool; for pipets, this means away from the tips.
2. After a bag or tube of pipets is opened, the container must be kept in a horizontal position, to prevent end contaminants from falling towards the tips.
3. Once a pipet is out of the container, it must not be touched to anything, and must be held only from the end opposite to the tips.
Tubes
1. When the closure is removed from a culture tube, it must be kept in the hand that holds a pipet or any other microbiological tool that will be used to add of remove material in the tube.
2. After removing the closure or before replacing it, the neck of the tube is run ever so lightly through a flame, to kill cells that may have landed inside the neck.
3. Tubes must be held at an angle; never vertical.
Glass or steel tools
1. Glass or steel tools cannot be flamed hot, because they would undergo damage. They must be sterilized with alcohol (70% ethanol), dripped dry, and passed through a flame to get rid of any remaining alcohol.
2. Importantly, realize that it is the alcohol treatment that is meant to sterilize the tool, not the flaming. You need not see a flame arise from the burning alcohol. Do not place a recently flamed tool in the alcohol jar unless you are ABSOLUTELY sure that it has cooled down.
More on aseptic technique
A wire with a loop is used with yeast and bacteria to transfer liquid suspensions or to streak-inoculate them onto an agar plate or slant. Slants may be inoculated also by stabbing with a straight wire. Moulds are best handled with a tough, flattened needle. The following is a general procedure.
1. Flame the wire tool to incandescence, holding it in a nearly vertical position in the flame. Run part of the handle quickly through the flame. A heavily soiled handle should be sterilized with alcohol if necessary.
2. Allow the wire to cool.
3. Pick a small amount of culture and perform whatever inoculation is appropriate.
4. Flame the wire again.
Exercise 2. Dilution plate count (viable count) of yeast
WORK IN PAIRS.
The success of yeast as a major object of study in genetics, biochemistry, and molecular biology is owed to a large part to the ease with which yeast can be manipulated in the laboratory. Essentially, most culture techniques that apply to heterotrophic bacteria (eg. E. coli) can also be used for yeast. To illustrate that point, we shall use the dilution plate count technique to estimate the number of viable cells in a grain of active dry yeast. The principle of this method is that under certain conditions a small number of viable unicellular microorganisms spread onto the surface of a Petri plate will grow into an equivalent number of colonies or clones.
1. Obtain some active dry yeast, and weigh, as cleanly and accurately as you can, a single grain (in milligrams). Think of a good way to do that.
2. Drop (cleanly still) the grain into a screw-cap tube containing 10.0 mL of sterile water (labelled 1). Wait a minute or two, cap tightly, and agitate the content on a vortex mixer until a homogeneous suspension is formed.
3. Label a series of tubes containing 9.0 mL of sterile water with the numbers 2, 3, 4, 5, and 6.
4. Using a sterile pipet, aseptically transfer 1.0 mL from tubes 1 to 2. Cap tube 2 and agitate vigorously.
5. Repeat the procedure, to transfer 1.0 mL sequentially from tubes 2 to 3, 3 to 4, etc., agitating thoroughly each time.
6. Label 6 plates of YM agar with the numbers 1 to 6.
9. Incubate the plates at 25`C.
YM agar
contains 1% glucose, 0.5% beef peptone, 0.3% malt extract, 0.3% yeast extract, and 2% agar.
Next Week- Follow up to Exercise 2. Dilution plates
A plate containing a suitable number of colonies (30-300) must be counted, and the number of colonies multiplied by the appropriate dilution factor to obtain an estimate of the number of colony-forming-units (CFU) per mL of the original suspension. In the present case, this will be converted to estimate the number of viable CFUs per gram of active dry yeast. The reasons for counting only the plate with more than 30 but less than 300 colonies are important. They have to do with sampling error and possible confluent growth. In reporting your results, avoid excessive significant digits and use exponential notation.
1. Select a suitable plate and count the colonies, using a colony counter if necessary.
2. Calculate the dilution factor associated with that plate, which will allow you to express the results in CFU per mL of original suspension. Remember that you plated 0.1 mL of each diluted suspension.
3. Calculate the results in CFU in a single grain of yeast.
4. Calculate the results in CFU per gram of dry yeast.
5. Explain the following: why CFUs and not cells per mL? Why more than 30 colonies? Why less than 300?
Lab # 2. Chromistan fungi, Chytrids and Zygomycetes.
Introduction
The array of living forms generally discussed under the heading "Mycology" is changing gradually. Formerly, any organism that did not clearly fit the definition of an alga, a protozoan, a bacterium, a plant, or an animal was considered a fungus. This included the Actinomycetes, which are in fact filamentous bacteria and, until recently, the slime protists, which are separate organisms related to the protozoa. Recent studies of rRNA have helped separate species which have traditionally been considered fungi into 2 Kingdoms.
We shall follow the broad classification used in the recommended text by Kendrick (Fig.1). This views fungi and fungal-like organisms as being divided amongst 2 kingdoms:-
i) several kinds of algae including the giant brown kelps
ii) non-fungal groups such as slime moulds
iii) motile, zoospore forming fungus-like organisms in the 2 main phyla:-
Hyphochytriomycota and Oomycota.:
iii) Glomeromycota - specialized fungi forming mycorrhizae -recently split off from the Zygomycota - usually no sexual stages.
Ascomycotina - sexual spores inside an ascus
Basidiomycotina - sexual spores borne on outside of a basidium
See the full page classification scheme included in this lab manual. Know the main features which distinguish each major taxonomical grouping.
Chromistan fungi or ‘water fungi’
Phylum Oomycetes -
fungi which form motile zoospores with two anterior flagella, one whiplash and one tinselSaprolegnia
, a saprophytic OomyceteSaprolegnia propagates by virtue of zoospores produced in the tip of specialized hyphae, the zoosporangia. Primary zoospores encyst and the cysts germinate into secondary zoospores. A zoospore that succeeds in finding food (dead seeds) gives rise to a new mycelium.
1. Place an asexual culture of Saprolegnia on your microscope stage.
2. Scan at low power through the floating mycelium, until you localize a mature zoosporangium. Maturity is recognized by the presence of a thick basal septum and of clear delineations between the spores. Mature spores only form 2, perhaps 3 rows inside each sporangium.
Saprolegnia may be monoecious (having seperate male and female structures but borne on same individual) or dioecious (having seperate male and female structures borne on different individuals). In monoecious forms, some hyphal branches undergo meiosis as their develop into antheridia (male gametangia), whereas other branches differentiate, also with meiosis, into oogonia (females).
1. Place a sexual culture of Saprolegnia on your microscope stage.
2. Scan at 10 x 10, searching for hyphae which have differentiated. Antheridia and oogonia are usually delimited by basal septa.
Find a mature oogonium - recognized by the presence of clearly delineated oospores in an oogonium surrounded by antheridia.
2. Eumycotan fungi – the main group of fungi.
Mostly non-motile.
A. Phylum Chytridiomycetes,
fungi which form zoospores with one posterior whiplash flagellumSeveral groups can be recognized within the Chytridiomycetes, from very simple to very complex. Our study will focus on a well-studied example, Allomyces.
Allomyces, a eucarpic saprophyte
Allomyces macrogynus is a free-living, eucarpic fungus in which the alternation of the haploid and the diploid phases is so distinct. Four different spore-bearing structures may be observed. The gametothallus bears, in pairs, orange-coloured gametangia (male), and colourless female gametangia. The smaller male gametes, responsible for the orange colour, may swim and fuse with female gametes, which are larger and slower swimmers. The resulting zygotes lose their flagella (which causes them to sink!), and germinate into sporothalli with basal rhizoids.
Gametothallus (1n)
1. Locate the dish containing blocks of agar on which gametothalli have grown to maturity. Mount an agar block on a coverslip, insert it into a perforated slide, and observe mature gametothalli. Identify and draw representative gametangia and free gametes.
2. Search for conjugating gametes and possibly a germinating zygote by pouring a bit of water off the same plate, placing the plate on the stage, and adjusting the microscope (10 x 10) until the bottom of the plate is in focus. Draw a germling if you see one.
Sporothallus (2n)
Spores of Allomyces are produced on other individuals (the sporothalli). Pale, thin walled zoosporangia (mitosporangia) produce large, clear zoospores (mitospores), and darker meiosporangia are usually observed in a state of dormancy.
1. Locate the dish containing blocks of agar on which sporothalli have grown to maturity. Mount an agar block on a coverslip, insert it into a perforated slide, and observe mature sporothalli. Identify and draw representative zoosporangia, free mitospores, and resting meiosporangia.
2. Pour a bit of water off the same plate, and see if you can observe germling thalli at the bottom of the plate. Are these likely to develop into gametothalli or sporothalli?
B. Phylum Zygomycotina,
coenocytic fungi with asexual sporangia and sexual zygospores
Zygomycetes, like many Chromistan fungi are coenocytic (multinucleate - hyphae not divided into cells by partitions or septae). Most species form a mycelium, but some can differentiate into unicellular (yeast) forms. Asexual reproduction is by formation of sporangia, which may or may not contain separate spores. Sexuality is usually the result of gametangial fusion resulting in the formation of a persistent, multinucleate structure called zygospore (or zygosporangium).
2. Order Mucorales
This order contains the most common Zygomycetes. It includes many moulds which participate in the decay of plant materials in nature. Members of the Mucorales have much industrial importance, being used for the production of fumaric, lactic, citric, succinic, and oxalic acids, and cortisone. A few species are parasitic. Some saprophytic species are common food and laboratory contaminants, or are used directly in the production of certain fermented soybean foods such as Tempeh. Mucorales produce extensive mycelium, and some grow unicellularly as yeast cells. Some make complex specialized growth structures.
a. Rhizopus
The common bread mould, Rhizopus stolonifer (R. nigricans), forms black sporangiospores able to germinate into highly invasive hyphae. The hyphae rapidly invade their substrate. Some hyphae differentiate into aerial hyphae and clinging rhizoids. Others thicken and darken to become sporangiophores. The sporangia are dark and spherical.
b. Phycomyces
Phycomyces blakesleeanus is remarkable in many ways. Its sporangiophores can reach enormous proportions and exhibit a phototactic response. Blakeslee, who investigated sexual compatibility in this fungus nearly 90 years ago, discovered an interesting pattern known as heterothallism.
1. Examine the flask cultures of Phycomyces. What is the significance of the growth patterns that may be observed?
2. Examine a plate culture of Phycomyces by placing it on the stage of a dissecting microscope. Identify the various growth forms, with particular attention to the morphology of the zygospores.
3. Where are the zygospores found in the plate? What is the significance of the growth patterns seen on the plate, in particular the dark lines formed at the intersections of cultures?
4. Observe and draw various stages leading to the formation of zygospores.
5. Observe cytoplasmic streaming in the hyphae . Cut out a small square of agar with hyphae and place it on a slide. Carefully place a cover slip over it and look for the movement of particles in the hyphal cells.
Important
- before finishing this lab visit the DEMO BENCH and study the material provided – it’s a key part of this lab. Remember to look at the material on slime moulds as we have not looked at this group to this point at all.
Life Cycle of Saprolegnia (Oomycete)
Life Cycle of Allomyces (Chytridiomycete)
Life Cycle of Rhizopus (Zygomycete)
Life Cycle of Myxostelida ( Slime mould)
Lab # 3. Eumycota : C. Phylum Dikaryomycota
1. Sub-phylum : Ascomycotina,
fungi with a restricted dikaryophase and ascospores borne inside asci.
Ascomycotina grow vegetatively as septate mycelium or single-celled forms, or yeasts. Hyphal septa may be incomplete, with the result that some compartments may contain indeterminate numbers of nuclei. Yeast forms are uninucleate. Asexual spores are conidia (externally delineated spores). Sexual reproduction is by formation of intracellular meiotic spores in an ascus. Some species occur only asexually and are classified in the form-subdivision Deuteromycotina.
A. Ascomycotina with asci that are enclosed in an ascocarp
Most ascomycetes other than the yeasts form asci in containers (ascocarps) developed from the ascoma.. Of these,
- the cleistothecium is spheroidal with no opening,
- the perithecium and the pseudothecium are pear-shaped with an apical opening called an ostiole, and
- the apothecium is open like a cup or a dish.
Perithecia are either free or imbedded in the cortex of a stroma (fruit body), and apothecia occasionally close upon themselves to form a spheroidal hypogeous (underground) fruit body.
i) Fungi which produce cleistothecia.
A cleistothecium has no opening so spore release depends on the cleistothecial wall deliquescing at maturity.
a. Eurotium (Aspergillus)
Eurotium chevalieri is the teleomorph or sexual state of the anamorph or asexual state of the mould Aspergillus amstelodamii. Hyphae give rise to club-shaped conidiophores, at the end of which flask-shaped cells, the phialides, produce chains of conidia. A typical foot cell is found at the base. Asci are formed inside cleistothecia. Each ascus generally contains 6 to 8 ornate ascospores. Conidia of various Aspergillus species are often intensely pigmented in green, yellow, black, purple, or other colours. Aspergilli are frequent contaminants, the agents of various mildews, or the cause of food spoilage. Some species produce potent mycotoxins. Much of the citric acid used in soft drinks is produced from Aspergillus fermentations.
b. Penicillium
Some penicillia have a known sexual state, but they are most frequently isolated as anamorphs. The vegetative growth is similar to that of Aspergillus, but the conidiophores are penicillate, or paintbrush-shaped, and lack a foot cell. Conidium pigmentation is usually blue. Penicillium species are important in the ripening of cheeses such as Camembert or Roquefort and their numerous relatives (Brie, St-André, Blue, Stilton, Gorgonzola, etc.). The first antibiotic, penicllin, is extracted from Penicillium . Many other fungal antibiotics, produced by the fungi to fight off bacterial attack, have been isolated and are now in use..
ii) Fungi which produce perithecia.
a. Sordaria, a free perithecium-forming fungus
Sordaria was used in the Biology 022/023 to demonstrate first and second division segregation at meiosis. A related fungus, Neurospora played a major role in the development of modern genetics, partly because of the ease with which the ascospores of this type of organism can be dissected and crossed. A film on the life cycle of Sordaria will be presented.
i). Carefully remove a few perithecia from the plate of Sordaria and place in a drop of water on a slide. Place a cover slip over the drop and apply pressure to break open the perithecia and release the asci. Observe the spores in the asci – are they all the same?
ii) Draw some representative asci showing different spore patterns.
b. Xylaria, Dibotryon, and Claviceps, stromatal fungi
Some fungi group their ascocarps in clusters in a body called a stroma
Xylaria polymorpha (dead man's fingers), Dibotryon morbosum (black knot), and Claviceps purpurea (Ergot fungus) have completely different life histories, but share the common characteristics of being plant pathogens and of forming their asci at the base of perithecia grouped together just under the surface of a stroma or fruit body.
See these fungi on the Demo bench and study the stroma
Important
- before finishing this lab visit the DEMO BENCH and study the material provided – it’s a key part of this lab.Apothecium Perithecium Cleistothecium

 Fungi with compound perithecia in stroma.
Fungi with compound perithecia inserted into a stroma
iii). Fungi which produce apothecia.
Apothecia are open cup-shaped ascocarps. They may be produced individually or grouped together on a complex fruit body. View the Demo material noting particularly:-
Morchella species are among the most prized mushrooms for gastronomists. Dried and fresh morels are sold to fine restaurants for considerable amounts of money. Attempts to cultivate fruit bodies of morels have generally been unsuccessful up until very recently. Examine preserved fruit bodies of Morchella. Where are the apothecia located?
b. Tuber
Tuber, the truffle, is a hypogeous fungus i.e. it forms its fruit bodies underground.. Like the morel, it establishes mycorrhizal relationships with certain trees. Good truffles, which sell for unimaginable prices, are used as seasonings in paté or other delicacies.
iv) . Yeasts - Ascomycetes, with free asci (not enclosed)
Over 500 of the nearly 800 known yeast species are Ascomycetes – often grouped together (Hemiascomycetes). Widely distributed wherever plants and animals interact, most yeasts serve as food enrichment for insects that feed on plant parts that are otherwise nutritionally poor. Some species, for example Candida albicans, are associated with mammals, including humans, causing various infections of the skin, or the respiratory or genito-urinary tract.
V. Lichens
Lichens are fungi (mostly Ascomycetes, occasionally Basidiomycetes) that have formed an associations with either green algae (Chrysophyceae) or occasionally blue-green algae (Cyanobacteria) (or sometimes with both types of algae). The Lichens are 95% fungal in biomass and are named from their fungal component. Over 40% of Ascomycetes no longer exist by themselves, only in their lichenized form.
Most lichens therefore produce typical Ascomycete sexual structures or ascoma ( e.g apothecia) which generate typical asci and ascospores. No mechanism has developed to include the algal component in these sexual spores so whenever an ascospore germinates, its only chance of long term survival is to find exactly the right kind of alga to associate with. – something that is made even more difficult by the fact that forming the association only seems to occur when the fungus is conditioned to do so by starvation ( at least this is the experience in lab attempts to create the association). Thus it is likely in most circumstances that lichen reproduction is primarily by the release of asexual structures- either simple fragmentation of the lichen, or release of small balls of cells (soredia) or projecting pegs ( isedia) – all of which involve both algal and fungal components.
Lichen structure.
Important
- before finishing this lab visit the DEMO BENCH and study the material provided – it’s a key part of this lab.Lichen Biology
Lab # 4. Eumycota : C. Phylum Dikaryomycota
2. Sub-phylum : Basidiomycotina, fungi with an extensive dikaryophase and basidiospores borne externally on basidia.
Basidiomycetes are best known for the great diversity of their fruit bodies. Basidiomycetes differ from ascomycetes in 3 important ways. First, their septa are complete, because the central pore, called a dolipore, is covered by a membranous network that controls cytoplasmic flow. Second, the dikaryotic phase, which is transitory at best in the Ascomycotina, represents a major part of the life cycle in Basidiomycotina. Third, the sexual (meiotic) spores of basidiomycetes are delimited externally on a cell called a basidium. Two major classes are:-.
1. Holobasidiomycetes incl. mushrooms and toadstools. These form basidia (not divided into compartments) directly from dikaryotic cells. The basidia may be formed (1) freely, (2) in an exposed layer, (hymenium) or (3) internally, in a gleba.
2. Teliomycetes, which includes the rusts, the smuts, and a few yeasts, produce no fruiting boidies and are characterized by the formation of dormant teliospores which give rise, by meiosis, to basidium-like structures that are subdivided into 4 compartments.
Two groups of Holobasidiomycetes can be recognized:-
a. Hymenomycetes - Gilled mushrooms (Agaricales)
Agaricales are a major group of Basidiomycetes, which produce the familiar ‘mushroom’ type fruiting body which on its undersurface is divided into many radial gills. A film describing the complete life cycle of Flammulina velutipes will be presented. The concepts of dikaryotic mycelium, clamp connection, basidium, and basidiospore will be introduced. Here the hymenium is at the surface of gills held up in a cap or pileus. Other important examples are shown as preserved specimens in the laboratory.
.
b. Hymenomycetes -Non-gilled hymenial macrofungi (Aphyllophorales)
The Agaricales as we just saw produce their basidia on hymenial surfaces borne on radial gills. However, other basidiomycetes exhibit an great variety of ways in which they form a hymenium. A number of preserved specimens are used to illustrate this. The basidia may be formed on surface folds, smooth surfaces, inside cylinders, on the surface of teeth, or in pores.
c. Gasteromycetes, including fungi which form a gleba
Some basidiomycetous macrofungi do not form a hymenium, but instead, produce amorphous masses of spores, the gleba. In this case, spore dispersal is highly dependent on the intervention of animals.
2. Class : Teliomycetes,
fungi which form a dormant diploid teliosporeThis group of fungi encompasses many plant pathogens termed rusts and smuts, as well as saprophytic yeasts with similar life cycles. One of the more famous of these is Ustilago maydis, better known here as corn smut. Although corn smut is considered a disease to most corn growers, it is treated as a delicacy in Mexico. Huitlacoche, as it is known, is used as a tasty food component in a way similar to truffles. It is delicious. The characteristic of this class is the formation of a teliospore from the fusion of the two nuclei in a dikaryotic mycelial cell. After a period of dormancy, the teliospore germinates meiotically into a tetranucleate germ tube (promycelium) which produces haploid basidiospores by repeated budding.
There are 2 major orders: i) Uredinales (Rusts); ii) Ustilaginales (Smuts)
Examine the species of rust fungi displayed on the demonstration bench, observing and making notes – be aware in particular of the different kinds of spores, their place in the life cycle, what ploidy they have (1n, n + n, 2n) etc.
2. USTILAGINALES (Smut Fungi).
Smut Fungi get their name from the very dark teliospores that they form in big masses – looking often like soot. Unlike rust fungi, smut fungi can
Smut Fungi usually develop systemically in the host plant (i.e. spread throughout the plant rather than restricted to a local spot and often only form their diploid overwintering teliospores in the flowers (stamens, ovaries) of the plant.
This fungus has interesting effects on the host including causing a sex change !
The life cycle (see Front cover of lab manual) will be discussed in class.
SMUTS – Demonstration material
Examine, make notes on and draw the specimens on the demonstration bench
The Life Cycle of a Mushroom (Basidiomycete)
Development of the fruit body in mushrooms.
 Gill structure.
Common Types of Mushrooms 
Fungus Identification Lab
Mycologists, both professional and amateur, sometimes meet at suitable times of the year to go on a fungus foray i.e. a search for fungi, often in a natural environment such as a forest or meadow. Such forays are most productive in the summer or fall, but a surprising number of fungi can be seen even in winter.
During this term please find time to go out and find some fungi.
Bring in some fungal specimens to the 7th Lab on Feb 19.
Try to identify your specimens at least partially before this lab i.e are they Oomycetes, Zygomycetes, Ascomycetes, Basidiomycetes etc.
Can you classify them beyond this first level?
2. IDENTIFICATION of Moulds
We will provide you with a number of mould specimens.
We know what they are but can you classify them to their genus?
To help you find out we will be using the very useful Guide:-
"Moulds, Isolation, cultivation, Identification "
published by one of Canada's foremost mycologists, Dr. Dave Malloch at the U. of Toronto.
This guide is available on the Web site :-
http://www.botany.utoronto.ca/ResearchLabs/MallochLab/Malloch/Moulds/Contents.html
We reprint part 8 and some of 9 of this guide here with Dr. Malloch's kind permission.
I highly recommend that you read the remaining parts.
MOULDS UNDER THE MICROSCOPE
There are many good texts on the theory and use of the microscope and I am thus going to assume the reader either has some knowledge of microscopy or can find it. My main interest here is with the particular skills necessary for microscopic examination of moulds.
Most beginners find moulds difficult to prepare for microscopic examination. Often preparations seem to contain only spores or mycelium, or structures that are so unlike any of the illustrations available that they are unidentifiable. Most of these problems can be overcome with a little practice and will, in time, seem trivial.
The first rule to remember in mould studies is to examine young, actively growing material. Older parts of colonies or moulds on natural material will often be partially decomposed or so covered with spores as to be unrecognizable. The best way to begin is to examine the growth from the margin of the colony where spores are being actively produced. It may require two or three attempts before the area of active sporulation is located, but when it is all the features of spore production necessary for identification can be seen. If the colony has been in Petri plate with other moulds for several weeks and is no longer actively spreading it will not yield good material for examination.
To make a good microscopic preparation from a mould colony, start by putting a small drop of mounting medium on a microscope slide. Microscope mounting media come in a variety of types and will be discussed separately; at the beginning, use water. Then, using a sterilized dissecting or inoculating needle remove a small (no more than 2 mm square) portion of the colony near the margin, taking with it a very thin layer of the agar surface. If the colony is thick and woolly, it may not be necessary to take the agar, but in the more appressed type it is essential. Place the piece of colony in the mounting medium, and, with a second needle, tease it out so that the filaments are well spread. A mount that has not been teased out will appear as an opaque lump yielding little information. Place a cover-slip over the mount, lowering one edge to the slide before the other so that air bubbles can escape. The remaining air bubbles can be removed from the mount by gently heating it over an alcohol flame. If it is heated too vigorously, the cover-slip will pop off explosively, splattering fungus and medium into one's face, so it is essential to heat it only until its steams slightly, not until it boils.
An interesting technique used by some mycologists for preparing microscope mounts involves sticking the mould to a bit of cellophane tape. The tape is pressed lightly against the colony so that some of the hyphae and spores stick to it. This is then placed sticky side up in a drop of mounting fluid (see below) on a microscope slide and covered with a cover slip. This technique is not restricted to colonies in Petri dishes; it works well on naturally occurring colonies in most habitats. The cellophane tape technique is commonly used for sampling moulds in
indoor environments.Most moulds will yield good results if prepared as outlined above, but a few present extra difficulties. The most problematic are those that tend to disintegrate as soon as they are mounted. Species of Cladosporium, Monilia, and Alternaria have spores connected in very fragile chains that can fall apart at the slightest movement of air. Mounts of these fungi invariably reveal only loose spores and a network of hyphae. To overcome this problem it is useful to set up slide cultures (figure 13). Slide cultures are made by setting up a small Petri dish moist chamber containing a V-shaped piece of glass tubing resting on several layers of moistened filter-paper. A sterile block of agar medium about 1 cm square is placed on a flame-sterilized microscope slide and the slide is then set in the moist chamber on the tubing. The fungus is inoculated near the four edges of the agar block and a sterile cover-slip is put over it. After a few days the slide can be mounted on a microscope, and the undisturbed mould structures viewed as they are growing. Later, if desired, the agar block can be removed from slide and cover-slip and two conventional slide mounts made from them. If they are allowed to dry before this is done, the mould structures are less likely to break apart.

Figure 13. Slide culture technique. A block of sterile agar is cut out of a Petri dish (A) and is placed upon a sterile slide resting on a bent glass tube within a sterile Petri dish (B). A few spores of a fungus are inoculated at the edges of the sterile agar block (C) and topped with a cover-glass (D) for incubation. A disc of moist filter-paper in the dish maintains humidity for the culture.
Using water as a mounting medium is easy and is often sufficient for satisfactory preparations. Water mounts dry up quickly, however, and do not allow any particular structures to be seen better than others. To overcome these problems, many different mounting media have been devised. Although the preparation and use of mounting media is a specialized and rather personal matter, there are a few that are in routine use in most laboratories because they offer distinct and well-known advantages. I offer below formulas and comments on some of these.
|
Distilled water |
100 ml |
|
Wetting agent |
A few drops |
Several products intended to be used as a photographic wetting agents can be used, eg. Kodak Photo-Flow or Edwal Kwik-wet.
This mounting medium has the advantage of preventing air bubbles from sticking to many fungus structures. I sometimes use it in place of water for making mounts of particularly dry moulds.
Solution 1
|
Phloxine ( a pink dye) |
0.025 g |
|
Distilled water |
100 ml |
Solution 2
|
KOH |
10 g |
|
Distilled water |
10 g |
The two solutions are kept in separate dropper bottles. A drop of each is put on a microscope slide and mixed with a needle just before use.
This is a useful staining medium for basidiomycetes and other fungi with compact and difficult-to-spread tissues. The mould hyphae are stained a bright pink colour and are thus more easily seen than in water mounts. It is best to draw as much liquid out from under the cover-slip as possible so that the background colour will be much paler.
|
Acid fuchsin (a pink dye) |
0.1 g |
|
Lactic acid (pure) |
100 ml |
Lacto-fuchsin will not dry up on the slide for several weeks and is thus useful if a slide must be saved for awhile. Drying can be prolonged even further by sealing the edges of the cover-slip with clear nail polish. Lacto-fuchsin is a strong stain that is especially useful for mounts of anamorphs and other easily spread structures.
|
Chloral hydrate<> |
|
|
Potassium iodide |
5 g |
|
Iodine |
1.5 g |
|
Distilled water |
100 ml |
This mounting medium is used extensively in mycology. Certain tissues turn blue to blackish in it and are said to be amyloid; others stain red and are called dextrinoid. It is a good general mounting medium that clears the material somewhat and allows particularly brilliant resolution with a microscope. For good resolution and colour in photographs through the microscope, I make up Melzer's Solution without the iodine, which yields a very clear solution. WARNING: Chloral hydrate should be handled with care as it is toxic. In addition it may be listed as a controlled substance in some jurisdictions, requiring special permission for purchase and possession
|
Potassium acetate |
6 g |
|
Glycerine |
120 cc |
|
Ethanol 95% |
180 cc |
|
Distilled water |
300 cc |
|
Ink Blue |
0.1-0.2% by weight |
A very good, all-purpose mounting medium that does not dry upon the slide for several weeks. As with Lacto-fuchsin, it can be sealed in with nail polish for even longer life. Ink Blue was not a part of the original formula but is useful as a stain for the walls of certain fungi. Other dyes can be used as well
Certain mounting media, such as lacto-phenol, are widely used in mycological laboratories but are very toxic and offer no particular advantages over those listed above. For readers interested in further mounting media I suggest those listed under "methods" in Ainsworth's Dictionary of the Fungi (1971) or Dring (1971).
One final hint for making good mounts. Many fungi are difficult to "wet", even when a wetting agent is used. For these, I suggest putting them in a drop of 95% ethyl alcohol for a few seconds and then, before the alcohol is completely dried out, adding a drop of the required mounting medium. This often works wonders with the driest to moulds.
Identification of moulds is based almost entirely on the structures bearing spores and on the spores themselves. Therefore it may be useful for the reader to go back to the beginning and reread the sections in chapters 1 and 2 describing the different kinds of moulds and their anatomy.
The most common means of identifying moulds is by the use of a dichotomous key, a very clever device presenting a series of alternatives for consideration. A glance at any of the keys that follow will serve as a demonstration. In the key for Group I, for example, there are two choices at number 1, two at number 2, two at number 3, etc., on up to number 14. Each pair of choices represents a decision to be made about the mould which is under examination. In number 1 one has to decide whether the mould's spores are composed of one cell or divided by cross-walls into two or more cells. If they are one-celled, the key sends one on to consider the choice in number 2; if they are more than one-celled, one must go to 12. Eventually the series of decisions will lead to a name.
Most books the reader may wish to use will have dichotomous keys that work in the same way as the ones here. But beware; some authors introduce a third or even fourth, fifth, or sixth choice in their keys that may not be noticed as first!
It is difficult to recommend one or even a few books on identification. The best I can do is direct the reader to a few texts as a good starting points. Ainsworth, Sparrow, and Sussman (1973) and Arx (1981) offer keys to most of the groups of fungi you are likely to encounter. If the mould under examination appears not to be an ascomycete, basidiomycete, or zygomycete, try starting with Barron (1968), Barnett and Hunter (1987), or Carmichael et al. (1980). Fungi forming spores in pycnidia can be identified in Nag Raj (1993) and Sutton (1980). For zygomycetes, start with O'Donnell (1979). Domsch et al. (1980), a monumental work treating all fungi known to occur in soil, includes keys, illustrations and extensive literature citations. It is an indispensible book for anyone doing serious work with moulds. De Hoog and Guarro (1995), Gravesen et al. (1994), Samson, et al. (1995), and St-Germain and Summerbell (1996) are beautifully illustrated books, the first and last dealing with fungi of medical interest and the others with fungi found on foods and other human-associated materials. Wang and Zabel (1990), dealing with fungi isolated from utility poles, is a very useful reference for wood-inhabiting fungi. It contains extensive keys and illustrations.
Two approaches are taken to identification in this section: a set of
dichotomous keys and a set of picture keys. Which you choose depends upon your individual preference. Some people are verbal in nature and do best when everything is written out; these people usually prefer dichotomous or other types of textual keys. Others are visual and prefer to match what they see to an image. You may even find you do best with a combination of the two.THE DICHOTOMOUS KEYS
The dichotomous keys are designed to work like the mind of an experienced mycologist, eliminating the most common or most expected fungi first and relegating the less common ones to the end. These are composed of keys to several groups of genera. Group I contains the most commonly encountered genera, group II those that are a little less common, and group III those that are less common yet, and so on down to the end. To use the key, start with the key to group I. If you are satisfied that the fungus you are trying to identify is not there, try the key to group II. If that does not work, go to Group III, and so on. The chances are greatest, of course, that the mould you want to identify is in group I, since these are the commonest of all moulds. If your fungus is not among the 60 genera in the whole key, you will have to turn to more complete or specialized books, such as those listed above or in the bibliography.
It should be pointed out that all identifications should be checked against the appropriate description and illustration following the key. It may also be necessary to turn to the references given there. Fungi from one group may be identified incorrectly in the key to another group and only the description and illustration will reveal the mistake. For example, Paecilomyces of group II will key out to Penicillium in group I, but this problem will only be discovered when checking the descriptions and illustrations.
THE PICTURE KEYS
These keys are arranged in the same way as the dichotomous keys: that is, te first set of pictures illustrates the most comonly encountered moulds. Those in the second set are also common, but not quite as common as those in the first group. To use the keys, browse over the first group to see if your unknown specimen matches one of the pictures. If you think it fits one of them, click on the picture for further information. If the fit is not very good, go back and try again. If the unknown is not in Group I, go on to Group II.
1. Spores 1-celled
21. Spores with more than one cell
12Usually this is obvious. Occasionally spores may have darkened areas resembling septa, but these will not be visible in optical section when you focus on the centre of the spore.
2.
(1) Colonies, spores, and other tissues colourless or brightly coloured 32. Colonies, spores, and/or other tissues dark coloured
8The dark colour is either brown or black. The best indication of dark colours comes from looking at the culture itself, either directly or with a dissecting microscope. Under the compound microscope many brown structures will appear nearly colourless.
3.
(2) Spores produced in chains 4Often chains of spores break apart thoroughly when placed in a water mount. In many species of
Aspergillus and Penicillium a few spores will remain together in a group, so that you can assume that they were originally in chains. On the other hand, species of Cladosporium produce chains of spores that completely disassociate on contact and leave no clue about their original orientation. The easiest way to check this is to examine the colony under the 10X objective of a compound microscope, being careful not to get spores on the lens.3. Spores not produced in chains
64.
(3) Conidiophores with a swollen head or vesicle bearing bottle-shaped phialides4. Conidiophores not swollen at apex
55.
(4) Spores in unbranched chains, borne from clusters of cylindrical to bottle-shaped phialides; colonies usually greenCompare with
Paecilomyces (group II), Gliocladium (group III), and Scopulariopsis (group III).5. Spores borne in branching chains from undifferentiated conidiophores; colonies often very fast growing and pink
6.
(3) Spores borne in a sporangium with a columella; often with only the columella evident as a swollen hyphal tip; hyphae not septateCompare
Rhizopus (group I), Mortierella (group II), Absidia, Circinella (group V), and Zygorhynchus6. Spores produced externally; hyphae septate
77.
(6) Conidiophores well-developed and usually with a central axis; very fast growing and with conidiophores usually produced in small cushions of hyphae; often greenCompare with
Verticillium (group II) and Gliocladium (group III)7. Conidiophores poorly developed or lacking; phialides produced singly along the vegetative hyphae; hyphae often aggregated into "ropes"; seldom or never green
Compare with
Verticillium (group II), Sporothrix (group IV), and Phialophora (group IV)8.
(2) Spores in chains, produced externally 98. Spores not in chains, produced inside sporangia or fruiting bodies (pycnidia)
109.
(8) Conidiophores with a swollen head or vesicle bearing bottle-shaped phialides; conidial chains unbranched9. Conidiophores lacking a swollen apex; spore chains often branched; spores often both 1- and 2-celled
10.
(8) Spores produced inside a fruiting body (pycnidium) with a cellular wall; hyphae septateCompare
Pyrenochaeta (group IV) and Microsphaeropsis (group IV) and also be sure that asci are not present at a very early stage10.Spores produced within a sporangium with a columella, often with only the columella evident as a swollen hyphal tip; hyphae not septate
11
11.
(10) Sporangiophores with rhizoids (branched "roots") at baseCompare with
Absidia (figure 2B)11. Sporangiophores lacking rhizoids
Compare with
Mortierella (group II), Absidia (figure 2B), Circinella (group V), and Zygorhynchus (figure 2C)12.
(1) Spores with transverse septa only 1312. Spores with both transverse and vertical septa
1413.
(12) Spores dark, produced in branched chains13. Spores colourless or brightly coloured, mostly with more than two cells, often canoe-shaped, usually produced in slimy masses; colonies often pink
Compare Cylindrocarpon (not treated here),
Candelabrella, Monacrosporium (all group III), and Trichophyton (group V)14.
(12) Spores usually in chains, usually club-shaped; colonies grey to brownCompare
Ulocladium and Stemphylium (group II)14. Spores in clusters but not in chains, usually spherical; colonies often (but not always) bright orange or yellow and purplish in reverse
Compare with
Stemphylium (group II)
1. Colonies composed of hyphae, or at least with some hyphae present
21. Colonies lacking hyphae; short chains of "budding" cells may be produced
162.
(1) Spores 1-celled 32. Spores with more than one cell
143.
(2) Spores and hyphae colourless or brightly coloured 43. Spores and/or hyphae dark coloured
104.
(3) Spores produced in chains 54. Spores not produced in chains
75.
(4) Spores produced from small clusters of tapering phialides, often rather pointed at the endsCompare with
Penicillium (group I) and Verticillium (group II)5. Spores produced by the simple fragmentation of hyphal segments into individual cells
66.
(5) Colonies very slow growing (slower than 5 mm/week), often grey, often with a strong earthy odour; hyphae usually less than 1 µ in diameter6
. Colonies growing faster, with a fruit-like odour or odourless, hyphae largerCompare with
Geomyces (group IV)7.
(4) Spores produced in sporangia, with sporangia often broken and represented only by simple blunt sporangiophores (no swollen columella); colonies often velvety in texture and pink to brown
Compare with
Mucor (group I) and Absidia (figure 2B)7. Spores produced externally
88.
(7) Spores produced in large numbers and completely covering the surface of large terminal cells; cells of conidiophores often flattening in alternating planes as they dry; colonies often producing black stony sclerotiaCompare with Chromelosporium (not treated here)
8. Spores produced at the tips of terminal cells and never covering them; cells of the conidiophore not flattening characteristically upon drying
99.
(8) Conidia produced in small round masses at the tips of phialides; phialides in whorls, tapering gradually to a very narrow tipCompare with
Acremonium (group I)9. Conidia produced singly at the ends of short branches; or in short chains, not on phialides; spore-producing cells not in whorls
Sepedonium and Trichophyton (both group V) and Geomyces (group IV) are similar
10. (3) Spores produced in sporangia or in fruiting bodies 11
10. Spores produced externally
1211.
(10) Spores produced within densely hairy fruiting bodies (perithecia), very dark; asci present when young11. Spores produced in sporangia
(Go back to 7)12.
(10) Conidiophores united to form large synnemata that have a sterile base and a spore-bearing upper part, often accompanied by spores of Echinobotryum (group V)Compare with
Trichurus and Graphium (both group III)12. Conidiophores never united to form such structures
1313.
(12) Spores arising in dense masses directly from swellings on the vegetative mycelium; colonies usually rather flat and moistCompare with Exophiala (not treated here)
13. Spores completely covering the terminal cells of erect conidiophores; colonies cottony and rather dry; black sclerotia often present
14.
(2) Spores with transverse walls only, colourless; colonies often pink; often associated with eelwormsCompare with
Trichothecium (group V), Candelabrella and Geniculifera (both group III)14. Spores with transverse and vertical walls, dark brown
1515.
(14) Conidiophores more or less straight because of their elongation directly through the scar of the previous spore, bearing only one spore at a timeCompare with
Pithomyces (group IV)15. Conidiophores often with a slight zigzag appearance due to new growth from just below the tip, often bearing a spore at each bend
Compare with
Pithomyces (group IV) and Curvularia (not treated here)16.
(1) Cells very small, seldom more than 1-2 µ in diameter, dividing by simple fission into two equal-sized daughter cells, sometimes containing a single internal spore16, Cells usually larger than 1-2 µ in diameter, dividing by budding, with the daughter cell seen as a small "bubble" arising from the wall of the parent cell, sometimes containing one or more internal spores (ascospores)
Compare
Aureobasidium (group II), Candida (group III), and Exophiala
This lab is a computer based simulation - details are provided on the Course Web site. You will do this at home or in the Campus computer labs - so no need to attend the lab that week.
Accessing the program - you can download the program from the Web site and run it on your home computer (PC not Mac) - or you can go to the campus computer labs.
There are 5 exercises involving a co-ordinated series of experiments designed to:-
After completing the exercises ( all or part of them) you print out your completed work and hand in the printouts after signing them.
IMPORTANT NOTE. The program does not save your work, so print out any completed exercises before shutting down the program. Thus you can either complete all exercises and then print out the results OR complete some exercises, make a printout and then finish and print the rest - handing in all printouts.
Lab # 7. Ecology of Fungi (Dr. Greg Thorn)
Ecology is the study of the interactions of organisms with their environment and with other organisms in it. Since there are perhaps 1.5 million species of fungi and they exploit almost every imaginable carbon-based resource as food (including organisms from every Kingdom of life), fungal ecology is an almost limitless research field. It is also an area in which many good and important questions have not been answered, so there are many opportunities for fungal ecologists: in plant pathology, medical mycology, terrestrial and aquatic ecology, biodegradation and bioremediation, and brewing!
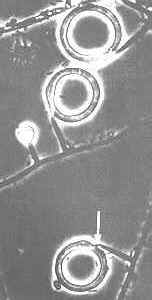
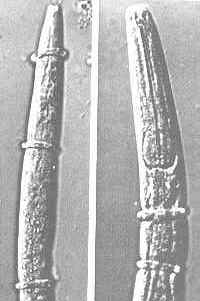
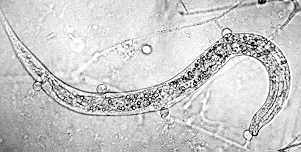
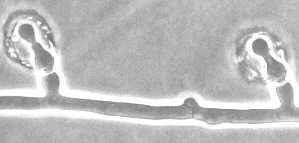
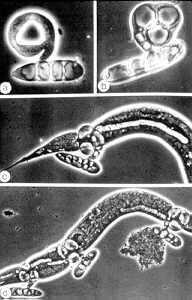
In today’s lab, you will study one very small (and yes, possibly obscure) area of fungal ecology: a guild of fungi that subsists by attacking and consuming nematodes. These fungi provide an excellent example of some fundamental principles in fungal ecology:
Here, in a nutshell, is what you will do:
Here is an outline of what needs to be done by the instructor:
Here is an outline of what needs to be done by the students:
On Lab Day (March 19) [the instructor and TA will assist you with these steps]
Questions to answer in your lab notes:
Figures from ‘The Fifth Kingdom Web page for Chap 15. http://www.mycolog.com/chapter15.htm
Nematode-exploiting fungi - a microscopic landscape, with Arthrobotrys oligospora (Hyphomycetes) catching nematodes in sticky nets, and producing conidiophores and conidia.

.