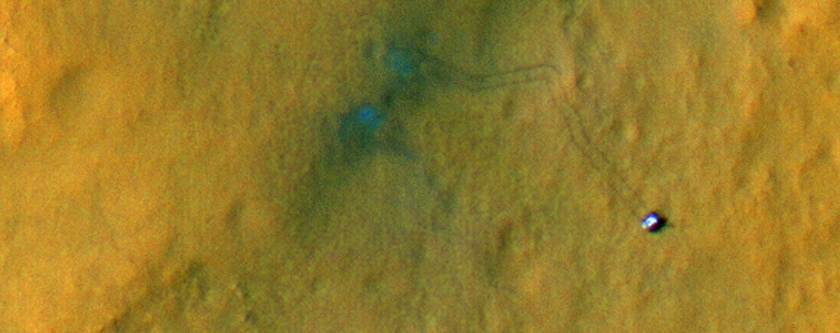
NASA's Mars Curiosity rover on Mars. It landed on 12 August 2012 between the blue spots in this false-colour image, and when the image was taken on 2 September 2012 the rover had driven to the southeast, leaving visible tracks behind it. Mars Reconnaissance Orbiter HiRISE image ESP_028612_1755.
In this project you are going to make a series of maps like those in part 1 of the project to zoom in on particular locations on Mars - for 4 different places where spacecraft have landed on the planet.
Your project, Part 2, should include the following:
1. A title page with your name and student number.
2. One page of text briefly identifying the spacecraft missions you chose to work with, what they did including dates and locations in latitude and longitude, and the images and websites you used to illustrate the locations.
3. The sequence of images. Aim for 2 to 4 to a page, and follow the advice below. Random images are not useful, they need to be from the best sources as identified and explained in class. Ideally each mission will need no more than 2 pages.
4. NO BINDERS, folders, duotangs, clips or anything else added to the report. Just staple your pages (you can find staplers in the Weldon library or in most printing places). Why? For you it's just one binder, for your instructor it would be over 100, so they would be too heavy and would take up too much room. This is an important specification, and marks will be deducted if it is not followed.
Use these websites to find what you need.
1. First we need to find out what has landed on Mars and where it might be. Search for 'mars landers' or something similar. Unfortunately none of the sites is completely clear and unambiguous about the landers - this is the best one:
https://en.wikipedia.org/wiki/List_of_artificial_objects_on_Mars
yes - Wikipedia! Use the map at the bottom of the big table, it shows all successful landers. You can add one more if it succeeds during the term, as we will discuss. Not that 'Sojourner' is the name of a rover, a mobile vehicle, not the actual name of that mission. You should be more accurate in your project. Strangely, the NASA sites are good but not very clear about which things landed successfully and which did not.
This website gives you latitudes and longitudes for your landing sites. Pay close attention to the fact that some longitudes are west and some are east of the zero (prime) meridian, from which all longitudes are measured.
.
.
2. High resolution (close-up) images showing landing sites:
These are only possible with the camera called HiRISE on Mars Reconnaissance Orbiter. But there is no convenient source for just these images. Choose 4 landers, and search on their names to look for HiRISE images of them. Try this first:
https://hirise.lpl.arizona.edu/ - and use the search window to find each lander. In class we will look at how you find the extreme close-up and one or two steps out from that from this source.
Or try a Google or other search - but a warning - these searches are trickier than they sound. We will look at this carefully in class.
.
.
3. A zoomable map of Mars: http://jmars.mars.asu.edu/maps/
It is a bit like Google Maps - you can use controls to zoom in and out, and by following the latutude and longitude you can zoom in where you want to go. This works for the global and regional maps. Unlike the Moon map it doesn't zoom all the way in to the spacecraft. You must try to find images that bridge the gap between the HiRISE image and this map.
.
.
4. If you can't make the connection between HiRISE and the zoomable map, try this site:
This is complicated and will be demonstrated in class.
.
.
Summary:
Website 1 lets you choose landers.
Website 2 gives you very detailed images of each landing site. It should gives you one or two steps out from there.
Website 3 is a zoomable map of Mars.
Website 4 is another zoomable Mars map with links to more detailed images.
The use of these sites will be demonstrated in class.
You could use any software you like to complete this project. It could all be done in Powerpoint, or Adobe Photoshop, or a drawing program like CorelDraw, Adobe Illustrator or Inkscape. Drawing software may not allow you to crop an image, but that part can be done in Word or Powerpoint. In class it will be demonstrated in MS Word. Everything can be done in Word including page layout and image processing (to improve image brightness or contrast).
Several things to consider:
1. Appearance is important. Make your pages attractive, symmetrical and legible. Random arrangements, inefficient use of space and images which are too dark or too bland to see properly count against you.
2. Every image should include something which is visible in the previous image, for continuity and ease of understanding.
3. Label or number images as in the example for ease of understanding.
4. The example does not include anything else like placenames. You can add names, using the nomemclature layer in Quickmap or any other lunar map. They must be accurate and spelled correctly. Some marks will be reaserved for this, so it's a good idea. Don't overdo it, one or two per picture is all you need, and probably only in the earlier images.
Marking is based on the accuracy, clarity and good design and appearance of the report. All these points will be discussed in class.
We will discuss the report throughout the first half of the term. The report should be handed in during class as noted in the schedule, with a penalty for being late. You have half a term to work on this, so don't leave it to the last week and then have to ask for more time. Remember... NO BINDERS!