Materials for today:
Let's download this basic fixed layout for today's tutorial.
And we'll use these images for playing with backgrounds:
![]()
![]()
![]()


Manipulating an existing layout
You can create layouts from scratch or you can use the layouts that I've already provided. However, from time to time you may want them to look different. For example, let's say you want your sidebar to be on the right side instead of the left.
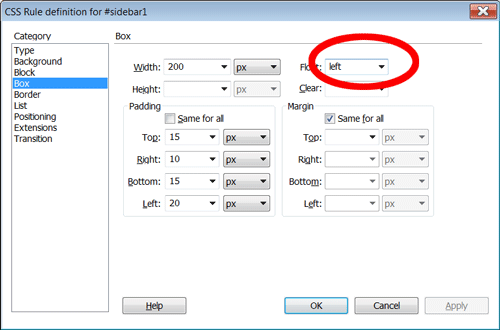
Now, switching the the layout position and layout is relatively easy. First, switch the float of the sidebar1 div from left to right:
It looks horrible, right? That's because the the margin in the maincontent div is still on the left side instead of the right. Now you'll have to open up the CSS again, and change that:
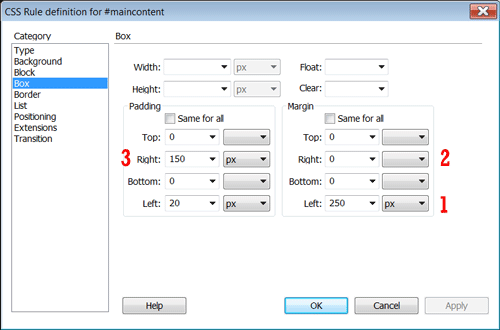
Right now it's 250 pixels on the left (1), but that should be on the right (2). Switch those. At the same time, you'll note there's 150px of padding for the right side (3), which is way too much with the sidebar now on the right. You'll need to change that too -- try 20-50px, whichever you think looks bests.
Now you have a sidebar on the right. You can use this technique with any of the layouts I've provided.
Creating a new div: Using the WYSIWYG
From time to time you'll need to create new DIVs and the CSS #ids to go with them.
Let's say, for example, you need to create a new navigation DIV for a page, and you'd like it to sit just under the header of the document. You can create this right in the code (in my view the easy way), or use the WYSIWYG.
First, identify where you'd want your new div to go. Let's say you want to insert a bar for your navigation after the header. In this case you'd highlight the header box in your Design View. Then go to:
Insert ...> Layout Objects ...> Div Tag
This will bring up a dialog box that looks like this:
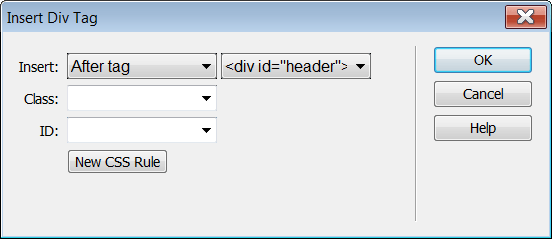
The insert pulldown is how you decide where the new div will go (in this case, after the header tag, which is the pulldown beside it.) You can also put a new div within an existing div (nesting it), around a tag, or before it.
Then for the ID, use the nav ID (if you've already created the rule) or click on: New CSS Style.
Writing the CSS Rule
This brings you to this dialog box:
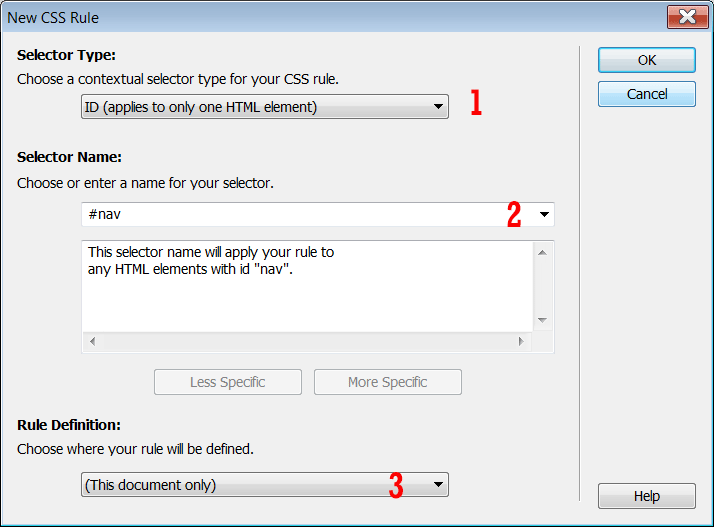
- This is the kind of rule you're writing (choose ID)
- This is the name you're going to give the rule (remember it's an ID so it needs a # symbol)
- This is where you're saving the rule. If you're working with an embedded style sheet, then say "this document only". Otherwise, choose the name of the style sheet file (e.g., style.css) you're using.
- Click OK
- It will return you to the Insert Layout Objects dialog, and you can click OK on that one too.
Using Code
If you're doing it in the code, simply look for the closing div tag for the header. (This will be very easy to identify, as it will have a comment in front of it and look something like this:
<!-- end #header --></div>
Then put in a new div right after this closing tag. Going with the example, I'd give it a CSS ID called #nav, and it will look like this:
<div id="nav">new navigation div goes here</div>
Then the CSS
Now you need to create a CSS ID to go with this. This you can also do in the code -- find your CSS rules (either a separate .css file, or embedded in the head of your document) and add a style rule. (You can add it anywhere, but I'd add it after your header rules.) It will look something like this:
#nav {
}
If you know the CSS elements you'd like to put in there, you can write them in the code, or now switch to the Design view and use the CSS Styles Panel to edit them. (Highlight the #nav rule, and then click on the pencil.)