Dreamweaver helps to remember how things are connected
One of the wonderful things about Dreamweaver is that it remembers how your files are connected. However, you have to instruct Dreamweaver where to find everything. This is done by defining the site, or managing the site.
This is the most important thing you can do to ensure that you're file structure will be in good shape. If you define your site in a local root folder (one main folder), Dreamweaver will be able to keep track of all the image files and HTML files that you're using in your website -- even if you decide to move them around! But remember, everything that you plan to have appear on your website HAS to go into the local root folder!
Walk-through of managing site in Dreamweaver:
- In the Site menu, click, Manage Sites ..>New ..>Site
- Click on the "New Site" button
- In the Site Setup dialog box:
- Give your site a name (this is not a filename, so it can include spaces, etc.)
- click on the folder to the right of the Local Root Folder and navigate to the folder where your website will live. Click okay. [you can see a screenshot of this here]
- Under Category, choose "Server"
- Click the + symbol [you can see a screenshot of this here]
- Fill out the following information:
- Name the server (publish server will do fine)
- Change the pulldown to SFTP
- Host: sftp.uwo.ca
- Username: uwo email name
- Password: your funky uwo password
- Host Directory: public_html
- Click "OK"
- Then click save ...>save ...>OK...>Done. [you can see a screenshot of this here]
Okay, now the Files palette should show what you have in your site so far. (There will only be the images folder and the images in it, plus the index file.) If this doesn't appear, go to the Window menu and choose "files".
 Publishing to the Server
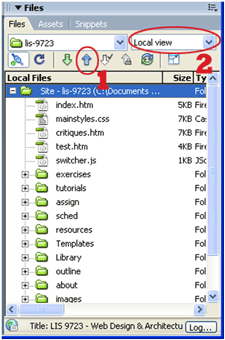
- Open Files Panel
- Highlight files (or folders) you wish to publish
- Click on blue "upload" arrow (#1 on screenshot)
- Check to see if the site updated properly in browser (remember, your url will be: http://publish.uwo.ca/~username)
- If you received a "not authorized" 410Error, change permissions:
- In Files Panel, use the pull-down to change from "local view" (your computer) to "remote view" (the server) (#2 on screenshot above)
- Right-click on folders and files now showing and choose "set permissions" from the dialog
- Change number in field to 755. [click here to see this in a screenshot]
- Go back to "local view" in pull-down.
A few tips for setting permissions:
- Do not set the permissions for the root folder (at the top of the dialog).
- You can only do one level of your hierarchy at a time. That means you will have to set the permissions for a folder first, THEN you can set the permissions for the files in that folder. (You can highlight all the files within one folder at one time, and set the permissions in one go.)
- Remember to go back to the local view after you’ve finished setting the permissions.
Remember you'll find your website at:
http://publish.uwo.ca/~username
Download this tutorial as a cheatsheet. [pdf]