
Templates
Note: We don't have access to Dreamweaver in the lab anymore, but I'm going to leave this lesson up here in case you have your own copy. The Templates tool is an incredibly helpful way to generate your pages, and keep your relative link structure up-to-date.
A useful Dreamweaver tool for building sites
Dreamweaver can be helpful for helping to generate the pages for your site. This is done with what they call templates. The first step to using a template is to define the site, or manage the site, in Dreamweaver.
This is the most important thing you can do to ensure that your file structure will be in good shape. If you define your site in a local root folder (one main folder), Dreamweaver will be able to keep track of all the image, CSS and HTML files that you're using in your website -- even if you decide to move them around! But remember, everything that you plan to have appear on your website HAS to go into the local root folder! (And if you make changes to the file structure, you MUST make them in the Dreamweaver Files Panel.)
Managing site in Dreamweaver:
- In the Site menu, click, Manage Sites ..>New ..>Site
- In the Local Category, give your site a name (it can be anything you want).
- In the dialog box, click on the folder to the right of the Local Root Folder and navigate to the folder where your website will live. [you can see a screenshot of this here]
- Note: if you're not going to use Dreamweaver to publish your files, you don't need to do the next step, but if you want to, then proceed.
- If you're not using Dreamweaver to publish, just hit the SAVE button in the bottom right.
To Publish with Dreamweaver
- Under Site, choose Server
- Click the + symbol [you can see a screenshot of this here]
- Fill out the following information:
- Name the server ("publish server" will do fine)
- Change the pulldown to SFTP
- Host: sftp.uwo.ca
- Username: uwo email name
- Password: your funky uwo password
- Host Directory: public_html
- Click "SAVE"
- Then click "Done". [you can see a screenshot of this here]
Okay, now the Files palette should show what you have in your site so far. If this doesn't appear, go to the Window menu and choose "files".
 Publishing to the Server
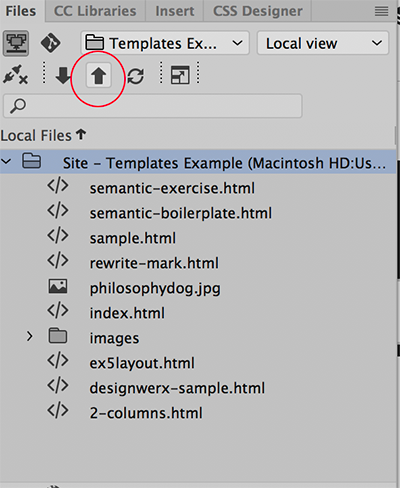
- Open Files Panel
- Highlight files (or folders) you wish to publish (if you want to publish the whole website, highlight the root folder, which will say Site -- Your sitename.
- Click on the put or "upload" arrow (red circle on screenshot)
- Check to see if the site updated properly in browser
Creating a Template
Now that you've defined the site, you can go ahead an build the page as a template.
- Layout the template as you would like it to look (in Brackets)
- Create your file structure for your entire site
- Link your persistent navigation to the correct files
- When you have everything looking the way you want to save it as a regular html file as a backup.
- Now save it as a Template:
- Go to File..>Save As Template
- The file is now a Template file, and you will have to mark a section or selection as editable.
- Go to the Design view
- Find the section you want to make editable, and click your cursor on the id so that it is highlighted [see screenshot]
- Right-click and choose
- Templates ..> New Editable Region [screen shot]
- Save again. (You don't have to Save as Template again, as it's already a template (.dwt) file.)
Tips and Troubleshooting
- You can also make a selection (highlighting) editable in the same way.
- Remember that Template files will look something like this: template.dwt (.dwt stands for dreamweaver template)
- Use a sensible name for your editable areas so that you can remember what you called them. (I usually match them up to the div id or tag name, for example: header, nav, content, etc.)
- You can't mark a section/selection as editable until you have saved the file as a Template file.
- Be careful not to "nest" Template files. (Never save a Template file using "Save As Template". If you want to base a new Template on a pre-existing file, just Save As.)
- Also, be careful not to "nest" editable regions.
Using a Template File
You have three ways of doing this:
Most often you will want to start with a blank template (ie., the persistent navigation and consistent page elements are there, but not the content).
- To do this, go to:
- File ..> New ..> Site Template
Sometimes you will have pre-existing pages that you'd like to apply a template to. (I would recommend this, actually, as it will give you a chance to pre-create your file structure, as in the demonstration.) There are two ways to do this:
- Open the file you want to alter.
- Go to Tools ..> Templates ..> Apply Template to Page. [screen shot here]
You can also use the Templates Palette (which is found under Assets)
- To do this, open the file you want to alter.
- Now, go to Windows ..>Assets ..> the second Icon from the bottom will show you the Templates.
- In the Templates palette, click on the template you want to apply (just once)
- Now, in the Templates palette, click on the "Apply Template" button on the right side of the palette.
Note: If Dreamweaver says there is not a place to put all the elements of the original page, then choose your main content area.
We can use this file for the demonstration.
Steps for Using Dreamweaver Templates
- Create Root Folder
- Build layout
- Manage site (in Dreamweaver)
- Build file structure
- Link file structure
- Save As ... Template
- Mark editable regions
- Apply Template to Blank Files